12 Days of Giving – Day 8

In the spirit of the holiday season, Starlight Theatre is sharing ideas for “12 Days of Giving.” We hope you will enjoy our suggestions for giving your loved ones – or yourself – some special musical-related treats this month.
If you’re in the mood for an old-fashioned holiday (and want to protect your fancy clothes while slaving over the stove), we suggest you make an apron for yourself and any kitchen helpers. Who knows…you might end up looking just like Dixie, who dons her apron while hosting Tupperware parties on stage!
Not only would a homemade apron be a unique holiday gift for a friend or family member, making an extra one for yourself will keep you neat and tidy while baking all those tasty holiday treats. It also will give you something to wipe your mouth with while you sample Dixie’s Jingle Jangle Jell-O shots you make (see recipe provided on Day 3 of Starlight Giving)!
Follow this simple step-by-step apron-making tutorial. Then share a photo of your end result and tag #StarlightGives.
And, if your DIY apron looks REALLY awesome, wear it to Dixie’s Tupperware Party on Jan. 12-17 at Starlight! We’re certain Dixie will give you a shout-out
You will need:
Fabric – 1 yard is ample
Thread and sewing machine
Step 1
Cut the fabric
First you need to measure the person whom you are making the apron for.
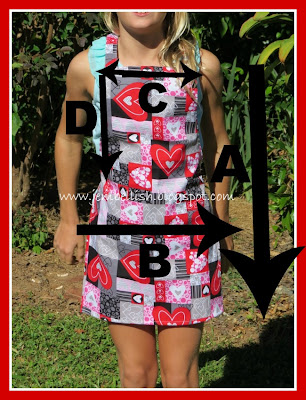
Measure.. the following:
A: From the collar down to knees (length of the apron)
B: Around the hips from side to side (width of the apron)
C: Inside arm to inside arm (width of top of apron)
D: From collar to waist (from top of apron to straps)
For the straps – use your tape measure to find a comfortable length around the neck – by lifting the tape over the head. The straps should both be around 4 cm (1.5″) longer than the width of the apron.
Step 2
Cut main apron shape.
Fold your main fabric in half then measure in from the fold at the top HALF of measurement C (for me this was 11.5 cm (4.5″))
Place a pin here.
Then measure down from the top edge of the longer side of the fabric – on the open edges, measurement D (for me this was 27cm (10.5″)).
Place another pin here.

Then cut through both layers of fabric in a curved shape from pin to pin:

Step 3
Finish off the edges of the main apron piece.
Simple double turn over the edge of the apron piece to hide the raw edges and stitch all the way around like this:

Step 4
For each strap:
1.fold the short edge over
2. Fold both long sides in to the middle
3. Fold one side over the other to completely hide the raw edges.
4. Top-Stitch around all 4 edges, remembering to turn in the other short end to hide that raw edge.

Step 5
Attach the straps to the main apron.
Place the apron flat, and pin the 2 straps and the longer neck strap to the back corners of the apron like this:

Stitch each strap into place securely by stitch a square with a cross through the middle where it joins to the main apron.

All done! Try your apron on and set to work in the kitchen!
For the downloadable PDF version of this tutorial, click here.
This tutorial is courtesy of www.jembellish.blogspot.com